Gunsmiths take note:The following information is useful to some aspiring gunsmiths. If you have information that would be interesting for those interested in learning more about gun repair or gunsmithing, please feel free to share it with us. We'd love to post it on this site. To email your gunsmith information or photos, email austin_long@yahoo.com
Glass Bedding
There are two goals to strive for through bedding a rifle. They are to eliminate possible stress to barrel, bolt and action and to ensure movement relative to its anchor points on stock is minimized during ignition. If the action does not return to the same position on the bedding after ignition it can not be relied upon to shot with consistent precision or accuracy.
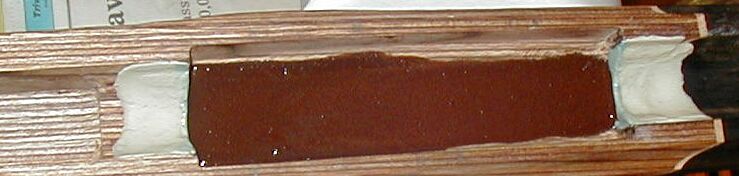
The barreled action part of the stock can be glassed in one step. After that bedding has cured the trigger guard should be glassed.
When finished only metal from the front of magazine inlet to a short distance forward of recoil lug, the back of recoil lug, the tang, and the trigger guard where guard bolts pass through will contact the glass bedding. The rest of the rifle should hang in air.
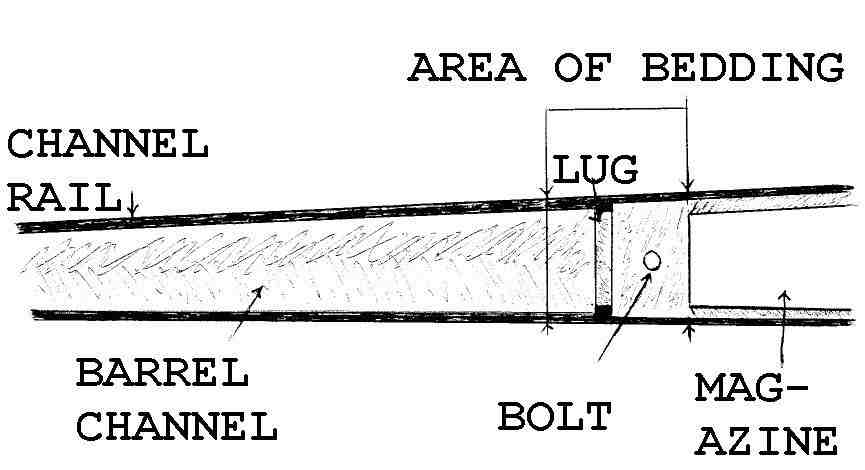
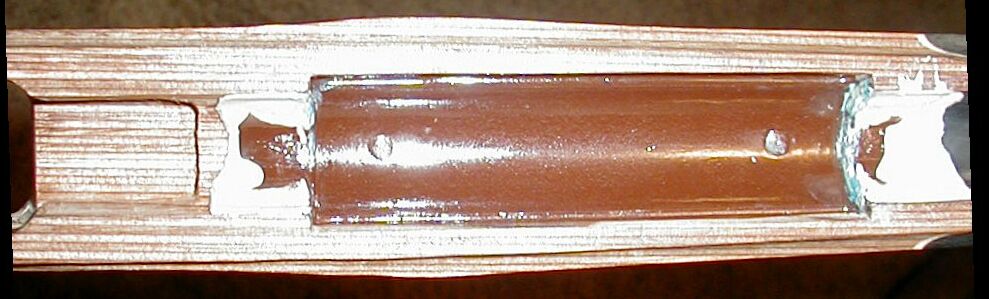
Top View of Stock
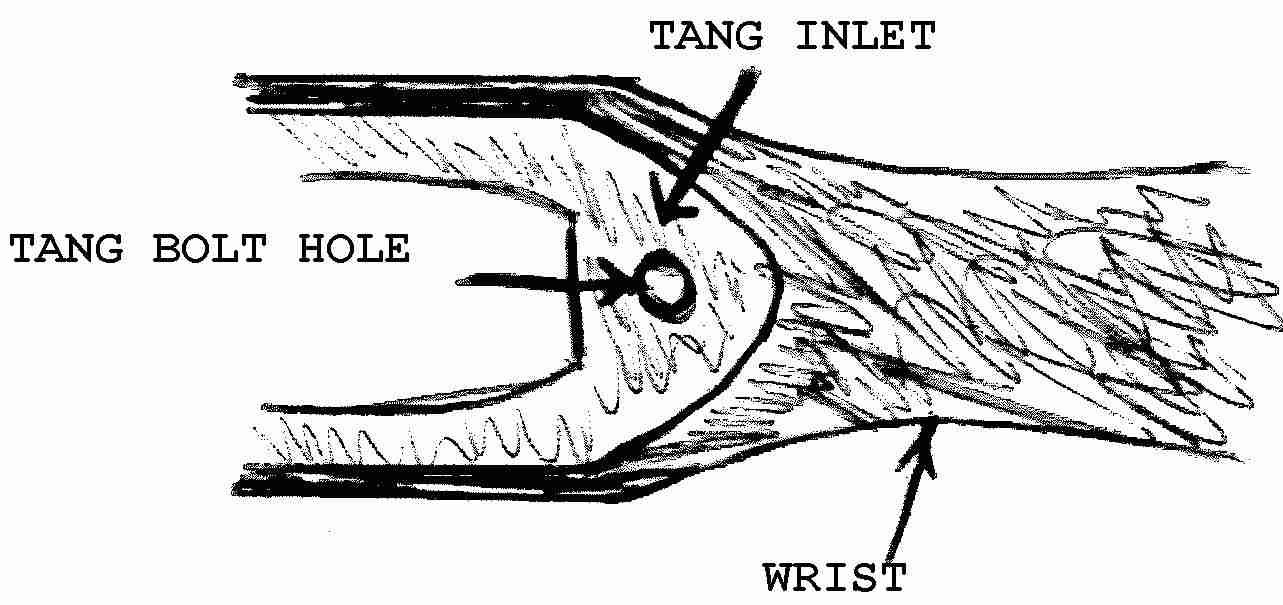
With course sand paper, rough the inletting from front of magazine inlet to about 21/2 inches forward of recoil lug. With rifle assembled lightly trace the outside of tang. Disassemble and carefully rough where the rifle tang only rests on the stock. Use a finer grit paper here since this area is small. Do not rough the wood bedding of trigger guard yet.
Here are suggestions as to how far to glass bed the barrel channel. Regardless of what is written be sure the bedding covers the center of gravity of the complete barreled action. Take the barreled action and balance it. The point of balance is the minimum extent of bedding: If your barrel is a feather weight (lighter than the normal sporter weight) you can stop the bedding about 1 to 1 1/4 inch forward of the recoil lug. If a sporter barrel make it 11/4 to 11/2 inch. If a bench rest barrel (commonly called bull barrel) make it 21/4 to 21/2 inches. If a lot larger than that forget this section entirely and learn how to install a barrel bedding block. The goal in bedding this area is to relieve the action of stress caused by barrel leverage at the breech threads. When finished the rest of barrel should touch nothing .
Recoil lug inletting will be glass bedded. Glass bedding the area between the recoil lug and wood bedding will help eliminate longitudinal travel of the barrel from the effects of ignition. Check that the recoil lug is not wider at the bottom than top. If lug is thinner at top than bottom or if lug slants back toward receiver epoxy bedding will lock it into place making it impossible to disassemble rifle without causing damage.
The back of recoil lug (the flat surface of lug closest to the receiver) should fit flush against the glass bedding. The sides, bottom and front should have clearance between it and bedding. Find some good plastic adhesive tape. Electrical tape will do. If you do not know the thickness of the tape, cut a couple small lengths. Stack two together and measure thickness with a micrometer until you find the number of layers needed to achieve 0.01 inch thickness. Tape the sides, front and bottom of recoil lug to 0.01 inch clearance. Do not tape the back of recoil lug.
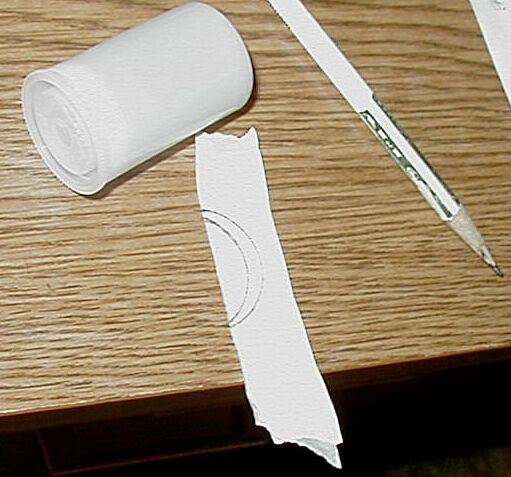
Modeling clay may be found locally. If not it can be purchased from such places as Brownells . Use a small amount of modeling clay to make a dam where the epoxy bedding is to stop in the barrel channel. Dam the front and sides of magazine inletting to keep epoxy from squeezing into it. Do the same at inletting adjoining the area of tang. Slowly place barreled action in stock pressing it into place. Remove and check modeling clay. Refashion the clay as needed and repeat until satisfied. Be sure that the barrel still recedes half way into barrel channel. Keep the edges of dam face flat so that you will have a neat looking job when done.
Remove all protective oils from the barreled action, trigger guard, guard bolts, magazine, and trigger assembly. Set the bolt aside. It will not be needed for at least 15 days.
Release agent should have come with the bedding kit. I use Brownells Original Glass Bedding kits. Coat the entire action, the inside of receiver, entire trigger assembly, tang, trigger guard, guard bolts, the back of recoil lug, the tape that was applied to recoil lug, magazine, and twice the length of barrel that is subject to bedding with release agent. If there is a magazine box attach it to the action and lightly coat where it attaches with release agent. Set parts aside to cure at ambient room temperature for a couple hours. After which a second coats needs to be applied. Let second coat cure for at least three more hours before proceeding. You can wait longer if you like but do not shortcut the release agent drying time. Take care that the film left by the cured release agent does not get mashed or scared. Epoxy will find its way into even a pin hole.
Tape exterior sides of stock from top to bottom where excess epoxy could contact when barreled action is fitted. Do not tape the top ridge of barrel channel. Place stock right side up in padded vise. Check with level to make it horizontal to ground. Cover table, floor, etc. to catch excess epoxy that may drop onto it. Have a rag soaked in vinegar handy to clean epoxy off your hands and stock. Keep vinegar bottle close by and some extra rags or some paper towels. If using paper towels have about 20 or so separated and close by. In wiping stock do not allow vinegar to touch any metal parts. It will corrode the metal. It will also destroy the release agent and compromise the epoxy. So keep vinegar away from the top of stock while cleaning off excess epoxy that has squeezed out. Otherwise it will seep into barrel channel and destroy release agent causing epoxy to bond to steel and also cause corrosion to develop.
In mixing the epoxy bedding compound add aggregates that may have been supplied with the kit (floc, steel or aluminum dust, etc). Add them according to the vendor's instructions. This will increase strength and stiffness of the bedding, much like gravel does for concrete.
Mix bedding compound according to the vendor's instructions. Apply enough compound to recoil lug inlet to fill it completely when lug is fitted. Apply compound from dam at front of magazine to dam forward of recoil lug. Apply a small amount to area of tang. Fit barreled action into stock. Without turning stock, fit trigger guard into place and assemble rifle with guard bolts snug but not as tight as you normally would. Quickly and carefully wipe excess epoxy off of stock without getting it on clean areas of stock or metal. It is almost impossible not to get it smeared somewhere else as you do this but it will all wipe clean if you work without interruption. Make sure barrel is fully seated (approximately half in channel but no more and consistent in depth its full length). Remove tape applied to stock and clean off any epoxy from stock it may have hidden. In good light check stock carefully to be sure no epoxy remains. Check all of stock including areas you thought not touched. If epoxy has found its way into checkering use Q-TIPs soaked with vinegar to wash it clean. Vinegar will cut uncured epoxy. It will also, as mentioned above, destroy cured release agent if it is allowed to contact it.
Wait 2 hours. Back guard bolts off 1/2 turn only. This will prevent them from seizing. Do not re-tighten guard bolts.
Twenty four hours after bedding remove from padded vise. Do not yet remove barreled action from stock or fire rifle. Store assembled rifle at ambient room temperature for 4 more days at which time, with some careful labor, rifle can be disassembled.
After bedding has cured disassemble rifle. It may well be necessary to tap barrel just forward of forend with a rubber mullet to break barrel and action loose. Do not tap high on barrel (close to muzzle). Remove all modeling clay and wipe clean. Remove plastic film of release agent from bedding and metal. Remove epoxy that may have found its way into the magazine or trigger assembly inletting with small files and sand paper. Take care not to score surface of bedding while cleaning the job up.
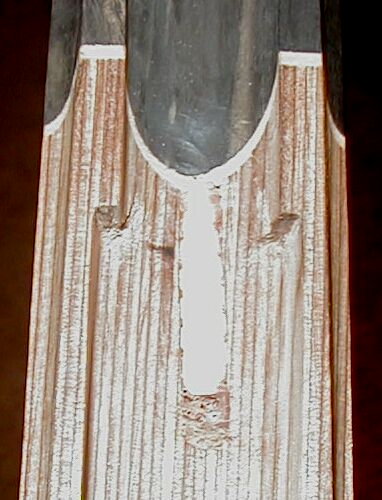
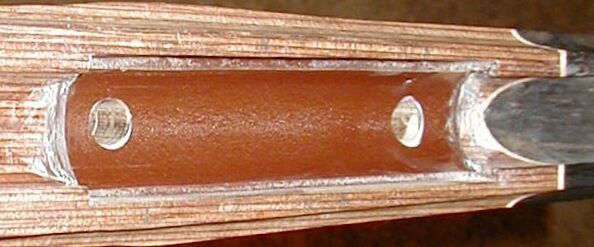
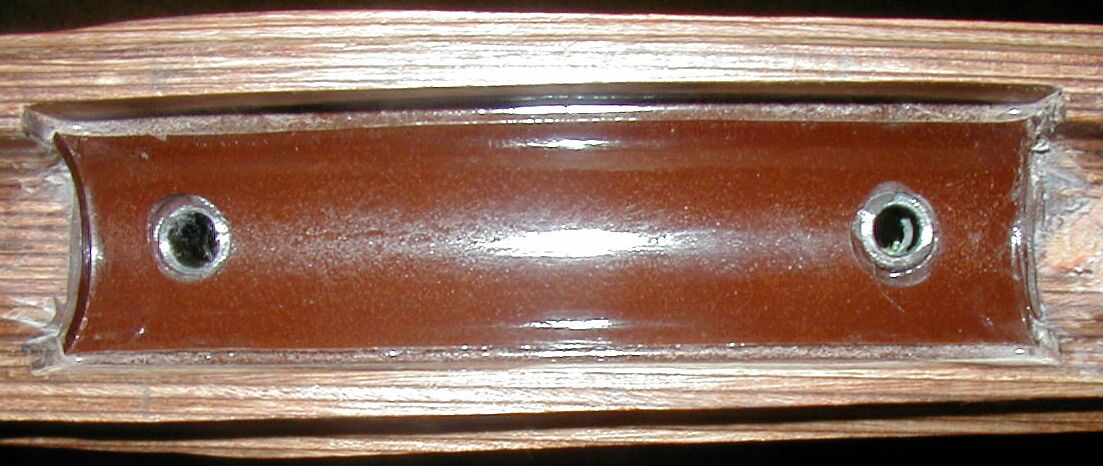
Remove 1/8 inch wood from trigger guard bedding (the points the guard bolts pass through). Use modeling clay to dam the magazine and trigger assembly inletting. As described above, protect trigger guard, guard bolts, action, inside of receiver, a generous portion of the barrel, and trigger assembly with release agent and apply bedding compound to trigger guard bedding points and assemble rifle. NOTE : Remember that 1/8 inch wood was removed decreasing the spacing between guard and action. So, do not thread guard bolts deeper than before. This will push bedding compound away from bed points and cause threads to enter receiver interior and to exit tang. The goal is to replace the 1/8 inch removed with 1/8 inch of glass bedding. If the rifle has a magazine box (such as the model 700 does) assemble rifle with magazine box installed. This will keep spacing between guard and action proper. Be sure the magazine was protected with release agent.
This time the rifle will be right side down and do not back guard bolts off after two hours. Observe the same curing period, 5 days total before disassembly.
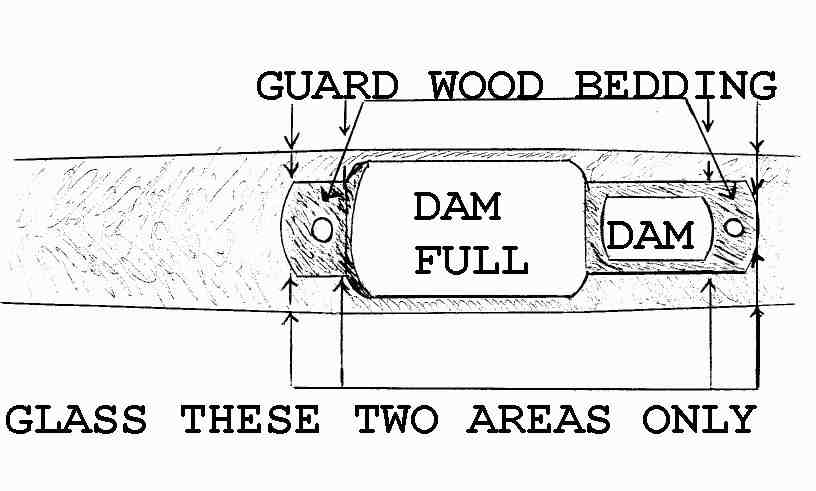
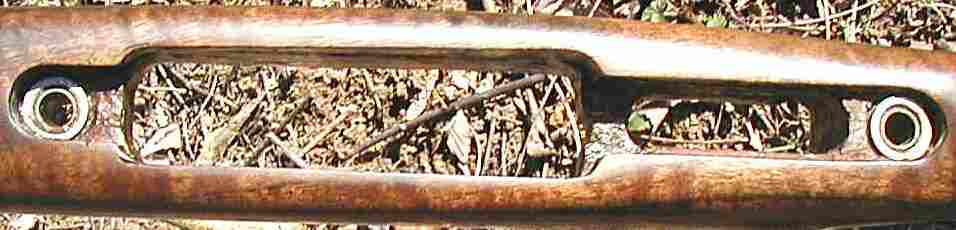
Bottom View of Stock - Trigger Guard/Magazine Inletting
After bedding has cured disassemble rifle. Remove all modeling clay and wipe clean. Remove plastic film of release agent from all bedding and metal. With fine grit paper, remove any film left on wood by modeling clay and seal those areas of wood left open to weather. Seal all exposed wood but do not get any sealer on bedding. Allow sealer to dry 2 days before assembling rifle.
Do not fire rifle until at least 10 days have elapsed from final bedding.
Pillar Bedding
This section has not yet been fully developed. In the mean time Pillar bedding by Darrel Holland is excellent.

Top View of Action Area Showing Pillars and Glass Bedding
Bottom View - Note That Pillars Extend Slightly Beyond Wood Bedding
Barrel Bedding Block Method
Barrel bedding blocks come in shapes that suit the builder. They can be rectangular, cylindrical, polygon and combinations. The intent is to surround the barrel with a metal (normally steel but can be aluminium) of a certain length and stiffness depending on the rifle to be used on. They are normally clamped or bonded to the barrel. Regardless of shape they are referred to as 'barrel bedding blocks '.
The barrel bedding block allows all the rifle to float; the action, magazine, trigger assembly and barrel hang in air. The only contact the rifle has with the stock is the block that surrounds part of the barrel. This method of bedding is normally found on rifles used for very long range shooting. Aside from the advantage just described it enhances rifle precision by increasing barrel stiffness by effectively increasing part of the barrel diameter and by relieving the barrel of supporting much of its own weight, though that part of barrel rear of block does support the weight of the receiver, magazine, bolt and trigger assembly.
Here will be described the procedure used to bed a Ruger 10/22 LR using the barrel bedding block method. Hopefully, the end result will be very tight groups to at least 100 yards. The theory used is the same as for custom large bolt action rifles (those this method is, so far, usually found on) but a lighter, shorter block can be used than otherwise suggested because of the relative lightness of the Ruger 10/22. In fact, I intend to offer these 10/22 blocks through this web site.
To do this a semi-inletted stock with wide forend wood was obtained to accommodate the extra width of the steel block that will surround the Green Mountain 0.92 inch diameter barrel chosen for the project. The stock, a wild cat design in walnut laminate, was purchased from Elk Ridge Unfinished Stocks and the extra forend wood was specified upon order. Also specified was that the normal retainer screw hole not be drilled.
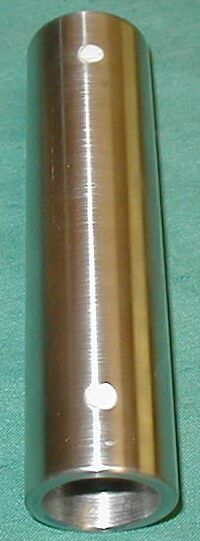
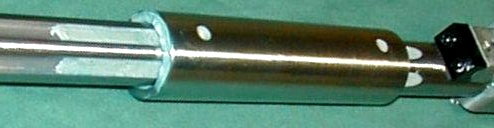
For the block a piece of stainless steel rod 1 1/4 inch diameter by 5 inches long was drilled 15/16 inch for the 0.92 inch rifle barrel to pass thru. The block was then drilled and taped for the two 1/4 by 28 retainer screws that will be used to attach the rifle to the stock. Then the block was polished on a lathe to 320 grit. A fine 28 pitch thread was chosen because of the rather thin (5/32 inch) block wall. The large 1/4 inch diameter retainer screw was chosen because the block supports the entire barreled action. The block will be epoxied to the barrel using glass bedding compound mixed with steel dust. Metal pillars will be epoxied to the wooden walls of the retainer screw holes and the block will rest on a bed of epoxy mixed with steel dust and the top of the metal pillars. No part of the rifle shall contact stock wood.
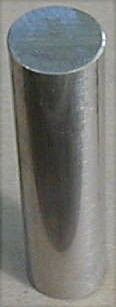
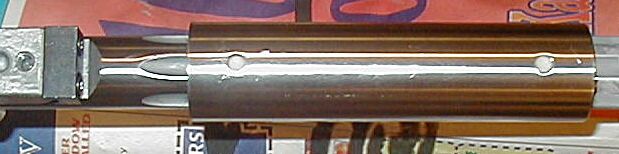
Left- 1 1/4 inch by 5 inch stainless steel
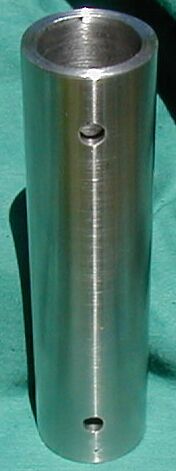
Right - after hollowing to 15/16 inch, drilled and taped for 1/4 by 28 retainer screws and polished to 320 grit. After squaring the faces the block is 4 15/16 inches long. The screw holes are 5/8 inch center from block face.
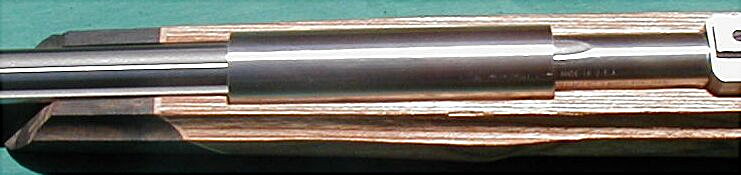
The back end of block was positioned as close to receiver as would still allow removal of barrel retainer screws. The position of the front and back of block was then marked on the barrel with a pencil so that the stock could be inletted to properly accept the block.
The spacing from front face of receiver to back face of block is 2 3/8 inch. In this position the 4 15/16 inch block more than covers the barreled action center of gravity with or without the scope attached.
Wood scrapers and sanding block with 80 grit paper were used to fashion barrel channel, action inlet and channel for barrel bedding block.
The block channel is deepened enough that the block does not touch its bottom or sides and 1/16th to 1/8th inch clearance is wanted at the bottom. The vacant area will later be filled with glass bedding compound. Enough wood is left at the barrel channel tip and receiver areas for the barreled action to rest on. After bedding the stock these areas will be scraped down so that all the rifle rests on is the glass bedding in the block channel.
Fitted and ready for bonding the barrel bedding block to the barrel.
Screw holes were packed with modeling clay to protect them from the epoxy.
Mineral spirits was used to degrease the inside of block.
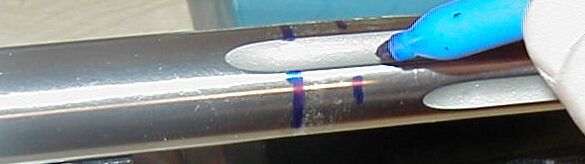
Left- The back and front face of block positions were marked with felt pen.
Right - A mark was made short of the front and rear faces of block were application of epoxy is to begin and stop. This will minimize excess epoxy from being shoved out while sliding block into position.

Because the barrel bedding block will be screwed rearward over the epoxy, tape was applied to protect barrel from being scared.
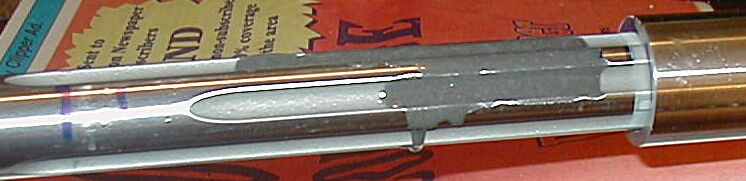
Brownells glass bedding compound was mixed with a generous amount of steel dust and applied to a couple inches of barrel at a time. The barrel was generously coated its entire circumference.

The block is slowly screwed over epoxy and stopped to apply more epoxy.
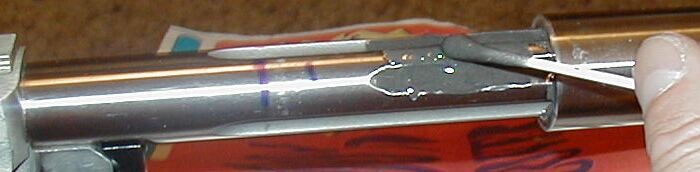
Left - Application of epoxy ceases at the epoxy line marked with felt pen (described above). The face of block is cleaned with cotton swabs.
Right - The block is slowly screwed into final position and barrel and block are cleaned of excess epoxy using many dry cotton swabs.
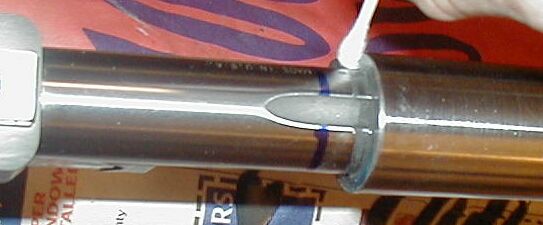
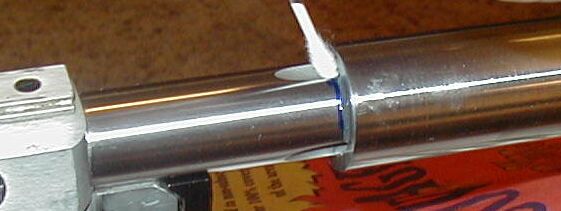
The barrel is carefully turned upside down to properly align retainer screw holes. The barrel is returned to the upright position to check horizontal alignment and check for excess epoxy. This is done several times until epoxy begins to set and one time the barreled action was briefly set in the stock to be sure horizontal alignment would be correct.
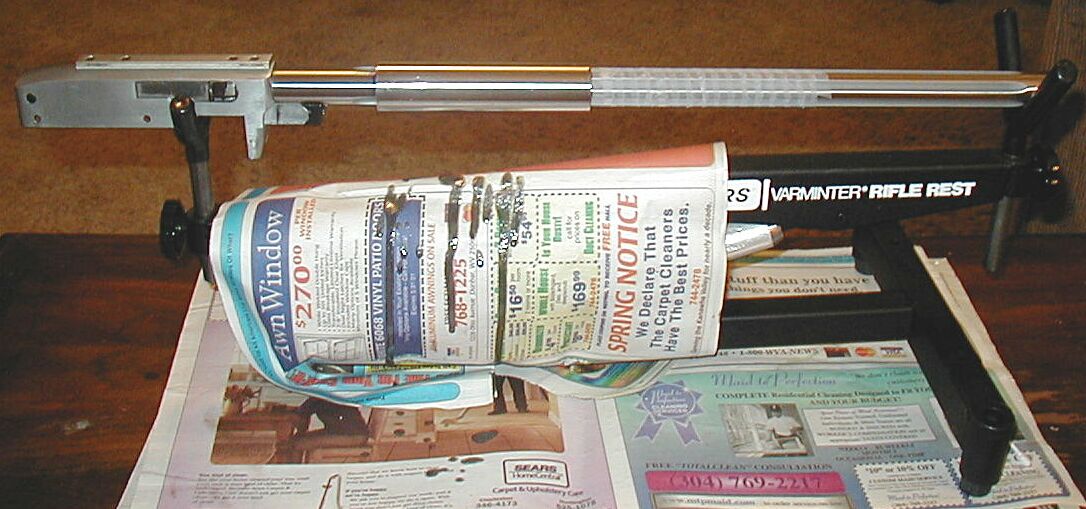
Rifle shown curing on the rifle rest that was used while attaching the barrel bedding block.
After the epoxy cured work was begun on glass bedding the stock.
Left - Before glass bedding inletting black was applied to block to make a final check for high spots on the wood bedding.
Right - Placing the barreled action in the stock shows a high spot marked by the inletting black at the upper-left-of-center in the block channel. The high spot was removed using wood scrapers.

Modeling clay was used to fashion dams at the front and rear where epoxy glass bedding is to cease. The dams were fashioned by installing and removing the barreled action in the stock several times until the desired position and shape was achieved. Initially the barrel was only allowed to sink a small amount into the clay. Depth was gradually increased as shaping progressed and at no time was more than the weight of the barreled action allowed to rest on the clay dams.
Five layers of masking tape was applied to the lower half of the front face of the block. This will permit easy removal and installation of rifle and stock by leaving a small gap between glass bedding and front of block. The rear of block is not masked and will fit flush against bedding so as to serve as a recoil surface.
Five strips of masking tape were stacked together and cut to the curve of the block face. A 35 millimeter film canister turned out to be the same diameter as the block (1 1/4 inch) and was used as a template to mark the tape for cutting. <
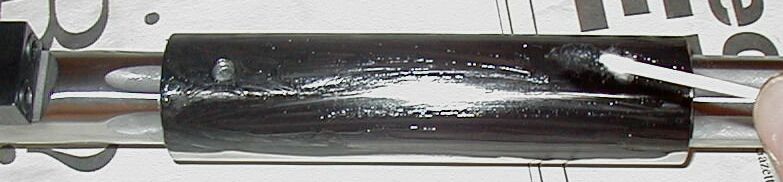
Here the barreled block is ready to be set in the glass bedding compound. Note the masking tape (described above) on the lower front face of block. The flutes and screw holes were packed with modeling clay to keep bedding compound from entering them and seeping into spaces between block and barrel. Three coats of release agent (that came with the bedding kit) was applied to all metal parts, tape and clay packing that might come in contact with the epoxy bedding compound. One coat of release agent was applied to the face of the clay dams in the stock. The release agent was allowed to cure 1 1/2 hour between coats and a bit more for the final coat.
As always before setting a rifle in bedding compound, an abundance of paper towels and cotton swabs were at the ready for a quick response to emergency clean up.
One part steel dust was mixed with 2 1/2 parts Brownells glass bedding compound. Enough mixture was carefully poured into the bottom of the block channel to cover only part of the stock walls when block is set. The goal is to provide a strong bed with minimum contact with stock walls to keep barrel from twisting sideways but minimize the effects of stock warpage.
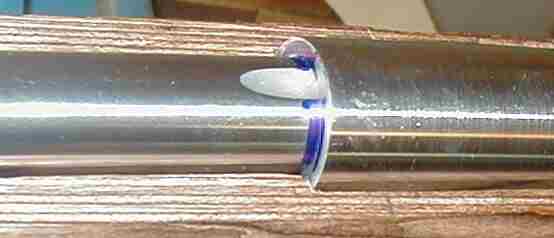
Note the release agent (blue in color) that was applied to the face of clay dams. The wood close to these faces was lightly scraped to remove any release agent that had gotten on it.
The barreled action is set in stock and left to cure. The rifle is attached to the stock by its own weight only. Note the small bubble level used to level the rifle so that the bedding compound disperses evenly as it cures. No bedding compound squeezed out between block and stock. Using a flash light to look between block and stock shows compound may have come about half way up walls. That is what is wanted.
Shortly after removing rifle from stock after bedding cured. Notice the marks left by the retainer screw holes making it easy to center the bit for drilling.
The epoxy over runs and modeling clay were removed. The retainer screw holes were drilled with a 7/16 inch bit for the 3/8 inch O.D. pillars to reside within.
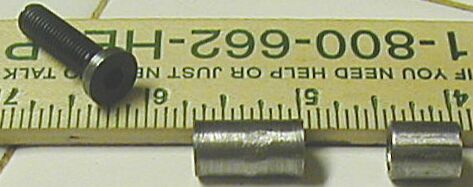
Two 1/4 inch I.D - 3/8 inch O.D by 1 inch long steel pillars, purchased from a hardware store, were cut to the desired lengths and roughed for bedding into the retainer screw holes. For this particular stock the rear pillar was cut to 11/16 inch and the front pillar to 7/16 inch. Hex head retainer screws are 1/4 with 28 pitch threads. To keep the screws from stressing the barrel, it is important the screws do not touch the barrel or epoxy bonded to the barrel when the screws are tightened onto the pillars. The rear is 7/8 inch long and the front screw is 3/4 inch long. The screw heads were turned to the approximate outside diameter of the pillars.
The barrel bedding block, barrel bedding block screw holes, retainer screws, inside of pillars and top and bottom of pillars were coated with release agent and allowed to cure 1 1/2 hours. Then a second coat was applied and allowed to cure 1 1/2 hours. The outside of pillars were not coated with release agent since that part of pillars will be epoxied into the stock. After the second coat of release agent had cured the rifle was set in the stock.
Masking tape was tightly wrapped around barrel bedding block and stock to hold rifle in place while bedding the pillars.
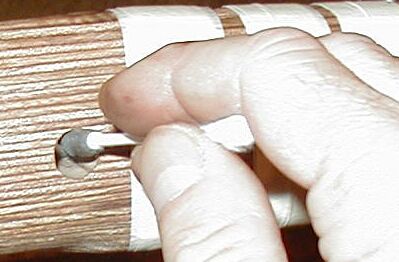
Bedding was mixed one part steel dust to two parts epoxy bedding compound. The walls of the rear retainer screw hole and the outside of the rear pillar were liberally coated with bedding compound. The pillar was then slide into place and tightened against the barrel bedding block with the rear hex retainer screw. The front pillar was then bedded in the same manner.

Placing the rifle upside down keeps the epoxy from running out of the retainer screw holes. The rifle is checked for level and left to cure. In order to keep the screws from ceasing, after about 45 minutes the retainer screws are backed off a full turn and re-tightened. This is repeated again a half hour later and again a half hour after that.
After pillars cured. High spots in the wood bedding can now be scraped away in order that all the rifle except the barrel bedding block floats in air.

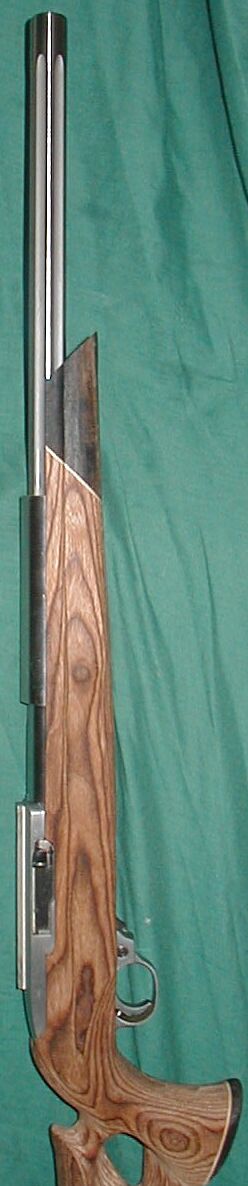

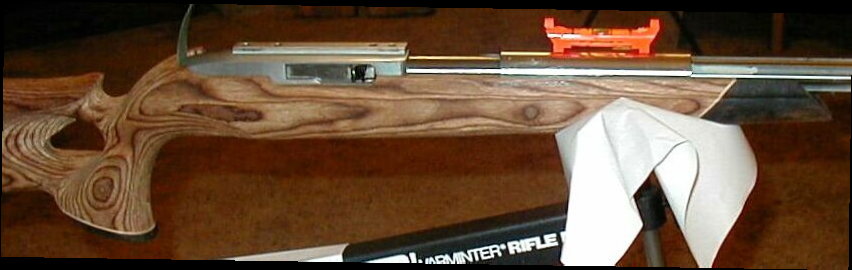
The stock is not fully fashioned but this gives a reasonable idea of what the rifle will look like with the barrel bedding block.
Important
Upon live fire testing the rifle it became apparent that the factory aluminum (stock) receiver was not stiff enough to retain correct aiming point when pressure was applied to parts of receiver or parts that contacted receiver. For example, if the front of trigger guard was shoved against a sand bag the guard housing would push the rear of receiver upward. This caused the scope (mounted on receiver) to point downward from normal. To correct the problem a small amount of glass bedding was applied to the stock where the rear of receiver/trigger guard assembly reside in the inletting. Doing so corrected the problem. However, in doing this the rifle is not totally free floating but still there is no part of the barreled action touching wood. An 'after market' steel receiver that is threaded onto the barrel should eliminate or closely eliminate this problem.The test targets displayed below were developed after the above modification.
Test Targets
The rifle was tested using three different types of Federal ammunition. Testing was conducted at a measured 50 yards firing five rounds into each of five groups per target sheet for a total of 25 rounds per target sheet. Four target sheets were used for a total of 100 rounds.Scope settings were changed between target sheets but were not changed while shooting each sheet. A Simmons ATEC 2.8 X 10 X 44 was used. The scope was set to 10X for all groups shot. All shots were fired from the OUTERS Varmint Rest shown in the above pictures.
Each group was measured using a caliper measuring tool. Calculations were based on the 'maximum spread' method. Group measurements were taken from outside of hole to outside of hole. Bullet diameter was then subtracted from that measure to arrive at group size.
Target #1 Target #2 Target #3 Target #4
A better understanding of the barrel bedding block method and theory can be gained from Long-Range Shooting & Hunting by Daniel Lilja. See his section entitled 'Rifle Inaccuracy'.
Sling Studs This may be helpful for those that work with metal and interested in bedding a rifle using the barrel bedding block method: Sling Stud for the Block
----->Go to Next Page (Inlays, Tips, and Caps)
<-----Go back to Previous Page
Other Topics available:
Wood Stains and Gun Stocks
Floating the Barrel
Glass Bedding
Pillar Bedding
Barrel Bedding Block
Inlays, Tips, and Caps
What is M.O.A.?
Calculating Rifle Precision
Target Crowning a Muzzle
Building a Muzzle Loader from Kit
Eliminate Trigger Over-Travel
Attaching the Recoil Pad