The primary purpose of a firearm muzzle crown is to provide propellant gases a
resistance free path away from all parts of the projectile as it exits the bore
of the barrel. The secondary purpose is to protect the bore from damage caused
by misuse. The third purpose is for good looks which is always achieved when
the primary purpose is satisfied.
There are two basic types of target crown - the 'step' and the '11 degree'. The
muzzle of the step crown is first cut 90 degrees of barrel (square) then about
half the muzzle radius is counter sunk with the wall of the counter sink
usually at an angle of about 45 degrees. The muzzle of the 11 degree crown is
sunk at an angle of 11 degrees from square (79 degrees of barrel). The 11
degree angle extends either the full muzzle radius or the greater part of
muzzle radius. The exact angle sometimes varies a degree or two from eleven and
is still referred to as being a target crown but through experimentation and
time eleven degrees is normally accepted as the optimum universal angle for
this type of target crown.
Step Type Target Crown
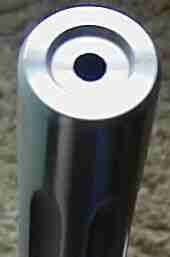
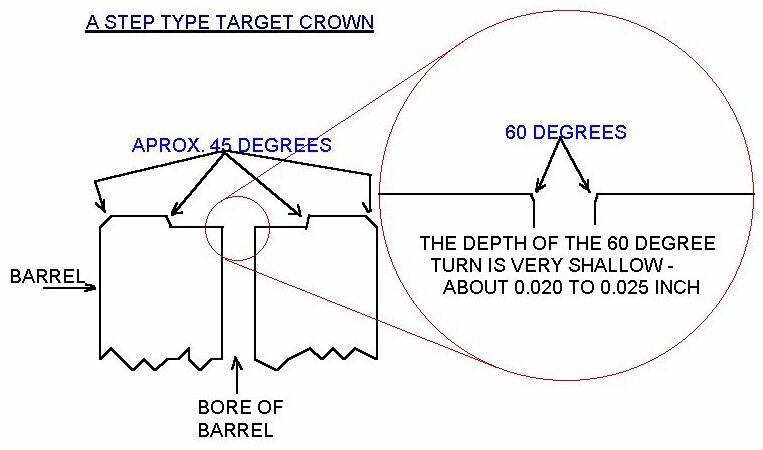
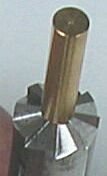
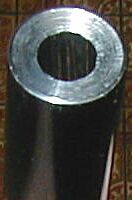
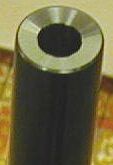
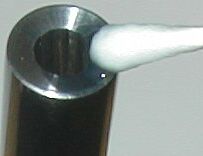
Picture shows a 'step' type target crown on a Green Mountain .22 caliber
barrel.
Below is a description and procedure for making a step type target crown taught
me by Ray Dixon, who cuts target crowns on target and varmint rifle barrels as
part of his profession.
Using a lathe with steady rest and cutting tool to turn and cut the work piece,
the muzzle is squared then stepped in a few hundredths of an inch. The sharp
edge of the muzzle is turned off at a non-critical angle to help protect it
from dings. Leaving metal above the circumference of the step (the crown)
protects the crown from dings.
The step is angled down at about 45 degrees to
help direct gas turbulence away from the exiting bullet.
Because gases should escape with equal resistance across the entire area of the
crown, it is important that all crown surfaces be smooth and similar throughout
its area. Attention to this becomes more critical as the crown approaches the
bore.
Using a 60 degree piloted bit attached to the tail stock of the lathe, the
sharp 90 degree edge of the bore exit is turned off at a 60 degree angle. The
importance of this is to protect the bore edge from gas erosion and thereby
ensure the bore exit remain smooth with no irregularities along its
circumference. Great care is taken to make this cut very smooth so that it be
alike along its entire surface. To aid in this the barrel is turned only by
hand while making very slow advances of the tail stock, which contains the
piloted bit. To help ensure the 60 degree edge be consistent in depth and bit
chatter minimized this cut is kept very shallow, only about 0.020 to 0.025 inch
in depth. The pilot of the bit is a diameter which matches that of the bore
closely enough to keep the axis of the bit aligned with that of the bore,
keeping bit chatter down and depth consistent.
Should the bore exit not be consistent about its perimeter gases escaping
unevenly around the bullet base will cause bullet yaw and loss of precision.
11 Degree Target Crown
Below is detailed the tool and procedure recently used to apply an 11 degree
target crown to the muzzle of a
Ruger
model Number 1B, caliber Springfield 30-06.
Left - .308 caliber brass pilot, 79 degree muzzle crowning cutter, cutter handle
and allen wrench for tightening pilot to cutter.
Center - the assembled tool used for cutting the 11 degree target crown.
Right - the business end of the tool.
All parts of tool were purchased from
Brownells
. The hex wrench did not come with the tool.
The 79 degree cutter is found through their web site index under
'CROWNING/BARREL' or 'CHAMFERING/BARREL'.
The handle for cutter and the pilot are both found under 'CHAMFERING/MUZZLE'.
Pilots are advertised for most calibers and are available in steel or brass.
Brass was chosen because it is softer than the rifling lands.
Two sizes of cutter are advertised: 1/2 inch diameter and 3/4 inch diameter for
small and larger barrel diameters. The cutter used here is the 3/4 inch
version which works for small and larger diameter barrels. Note that using
this cutter, crowning a 1 inch diameter barrel would leave a minimum of 1/8
inch radius uncut but none-the-less would yield a proper functioning 11 degree
target crown.
The original factory crown just before cutting it to an 11 degree target crown.
Honing oil is applied to cutter and muzzle before any cutting is performed. It
is also wise to apply oil to pilot to reduce possible friction to rifling lands.
Periodically cutting stops to clean metal shavings from muzzle, bore and tool.
Honing oil is re-applied before cutting continues. The oil used here is honing
oil sold for knife sharpening.
Left - crowning cutter with pilot inside bore, ready to start cutting.
Center - beginning of target crown after only 10 or 12 light 1/2 rotations of
cutter. Care is taken to keep
light and consistent
downward hand pressure centered on bore so pilot does not wobble. Cutting is
performed slowly and can be stopped and resumed at will but it is important to
keep cutting surfaces coated with the oil and to clean metal shavings from
bore, muzzle and cutter before re-inserting pilot.
Right - to keep shavings from getting between cutter face and muzzle care is
taken cutter never leaves the surface of muzzle while cutting is being
performed. Cutting is often stopped to clean shavings from muzzle, bore and
tool and to check depth of cut.
As cutting goes deeper into muzzle cutting slows because more muzzle face is
contacting cutter surface. Cutting is often stopped to check for depth and to
clean away shavings. The muzzle becomes very sharp where it enters the bore
and ruff cutting is stopped just short of maximum barrel radius. Shown above
the ruff muzzle is ready for finish cutting after about eight careful cutting
sessions.
Left - finish cutting is performed with increasingly lighter pressure as cutting
progresses until almost only the weight of tool is applied to the muzzle.
Center - crown after finish cutting.
Right - a thin and even amount of 00 steel wool is placed on cutter face and
used to
lightly
burnish any microscopic burrs off muzzle crown. Care is taken
to flatten the wool against the cutter face before inserting pilot into bore
and it is important not to over burnish using this method because any steel
fibers accidentally allowed into bore could score rifling lands.
Left - after using alcohol to degrease the muzzle OXPHO-BLUE from Brownells is
used to cold blue the muzzle.
Right - Three coats of blueing agent was applied to muzzle. After each
application the muzzle was wiped with dry towel and
lightly
polished using 0000 steel wool.