Inletting a Rifle Stock


Here is described inletting of a semi-inletted stock for an average bolt action design. Some rifles require additional inletting not described below. Following these procedures should equip you for other inletting tasks.

You will need sand papers , sanding block(s) , a small assortment of files, perhaps a small wood chisel, the barreled action and the semi-inletted stock. Having some inletting black may help. It can be found at such outlets as Brownells . A dremel tool may be helpful at certain spots if used with great care and at slow speed. Remove the bolt, trigger guard and magazine. Along with action bolts, set these parts aside. They will not be needed for some time.

The first objective is to get the action to fit far enough into the inletting for the barrel to contact and lay centered upon the barrel channel. At that point the barrel and action inletting can slowly be worked alternating between the two until the action appears that it would fully seat if the barrel could drop far enough into its channel. There can be some friction but do not force action into inletting as that may crack the thin walls of the side wood. Later all friction must be removed for the rifle to shoot with precision. If the barrel is not centered on the channel use inletting black to locate and remove wood stress points at the action. Do not fashion barrel channel until action is true with channel, otherwise barrel will run off center of stock.


Action
Study the current extent of inletting at the action area well before removing any wood. Chances are you will have to remove at least a little from all sides and a bit more in some areas. Remove small amounts of wood at a time equally from all sides and check fit until the bottom of action begins to fit into the stock. Once you get this far inletting black can help identify wood that needs removal. Use the black very sparingly applying it only to parts of action that, so far, will fit into the stock.

Use a sanding block on the side walls of action inletting and keep it flat against them. Do likewise with any filing you may have to do. This will prevent the top of the walls from becoming too thin or rounded. It is important to keep it crisp because at this area of stock very little wood can be removed for correction and if rounded or too thin it will show as a sloppy fit.

Bed wood may well have to be lowered in order for action to seat far enough into inlet. Judge this by how far the barrel is allowed to drop into barrel channel. The barrel should be allowed to drop to or close to its diameter (half way). Though, it is equally important that the barrel not be allowed to drop past its diameter (more than half way). You will not know if bed wood will have to be shaved from action inletting until barrel channel inletting is far enough along. If it becomes necessary a small wood chisel should be used, removing very little wood before checking fit.


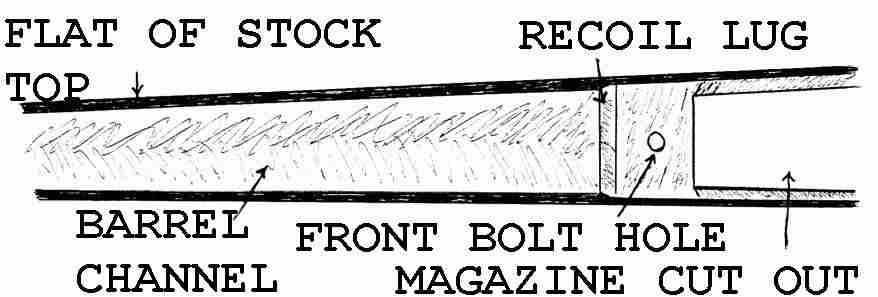
Partial Top View of Barrel and Action Inletting
Keep flat of stock top sharp where it drops into barrel and action inletting.


Barrel Channel
If a forend tip is to be installed it is best to do it before inletting the barrel channel.

Once the action is inletted to the extent that when installed the barrel rests centered on the grove of barrel channel, the channel can be enlarged. Find something cylindrical to use as a sanding form (I hesitate to call it a sanding block since it is round). I have used ink pens. A short piece of steel rod found at hardware stores is great. What ever it is it must be smaller in diameter, including sand paper , than the barrel is at for-end tip. If it is, with paper attached, as large in diameter as barrel you will get rounded edges that can not be corrected because of the large gap that would be left between barrel and top of stock.

As explained above, fashion your channel such that the barrel will seat halfway, and no more, into stock when rifle is assembled. Slightly less is permissable. More than half will cause a large gap between wood and metal since the stock will be above barrel axis. Also, glass bedding will wrap around barrel diameter and seize it to stock. To a small extent, and it depends upon the amount of wood your stock can sacrifice, such problem can be resolved by working excess wood down to midpoint of barrel and action. In such case watch that forearm remains functionally massive enough for comfortable shooting control and that tang is not dropped so far as to cause thinning in wrist area of stock.


Top View of Stock


Start out with about a 120 grit paper, courser if needed. Cut a square to wrap around the sanding form. Sand the grove with the cylindrical sanding form laying upon it. Periodically fit the barrel to check your work. If the barrel has a taper, such as sporter rifles do and bench rifles may not, you will have to widen the grove to match the contour. Applying downward side pressure as you sand will do that. Take care to match the contour of the barrel as you sand. To help prevent unwanted rounding of edges, cut the channel deep enough to allow side pressure without cutting too high on the channel. When deep enough that a sanding block, such as a gum eraser, can be used do so to finish the contour without rounding its edge. Be careful not to cut too deeply at for-end tip as that will show as a nonuniform gap.

Inletting for the recoil lug will probably already be deep enough. With inletting black applied to bottom of recoil lug, check to see if lug bottoms out. If so, careful use of a dremel tool set to slow speed can be used to remove very little wood at a time until lug clears the bottom of inletting. If you know you will not be glass bedding the stock, care should be taken not to remove wood from back of recoil lug inletting. This is the flat closest to butt end of stock, the surface which transfers recoil to the shoulder and helps to keep rifle consistent in position relative to its anchor points at the stock.

When finished inletting, the barreled action should drop into the stock with no wood causing it stress and no high spots in barrel channel, recoil lug recess, or action area.


Floor Plate/Trigger Guard
Trigger guard inletting will most likely also be undersized. The lines will be correct, or close, so that all that is needed is to enlarge the inletting. This is done with sand paper. The original inletting will be centered with stock bottom and action inletting so take care to remove equal amounts of wood from opposite sides. Wood can be removed at front of receiver bolt hole and at rear of tang bolt hole with a slow speed dremel and sanding wheel. Remove minute amounts and check for a glove fit. As always, keep edges sharp.

If there is no floor plate, the wood bedding of the trigger guard can be shallowed with a small wood chisel until action and trigger guard can be properly assembled. If there is a floor plate the assembly may not seat fully into inletting until the outside is shaped. This is because the hinged plate may be wider than the magazine inletting. Keeping the plate opened or removed will allow you to complete inletting before shaping the stock.

Deepen wood bedding enough to allow full threading of guard bolts when rifle is assembled. Do not allow threads of bolt to extend into receiver or through the tang. Doing so can cause bolt damage and danger. If too much bed wood is removed the guard will have to be raised with glass bedding before shaping the stock. Often check for proper assembly as you deepen the bedding.


Bolt Handle Recess
When finished, inletting will follow contour of bolt handle in width and depth. It will be deep at top and converge with stock face as dropped bolt handle extends out of the wood.

If the machined stock came with any inletting at bolt recess, widen it a little at a time until handle begins to snuggly drop into it. If there is no inletting use a sharp pencil to mark were handle contacts top of stock and start the cut inside the marks, keeping the initial grove narrow. Deepen and widen very small amounts of inletting at a time, slowly working down the stock face with small flat files for sides, which will be flat and sharp, and sanding block for bottom. Often check fit with rifle assembled (guard bolts installed). Keep the fit snug until bolt will lock into the closed position. If the bolt handle is round (most are) at the point it exits the inletting, terminate the inletting with a curve (inletted area closest to bolt knob).

The lines of inletting should follow the lines of the bolt handle. Once bolt will close, remove small amounts of wood until bolt handle no longer touches wood on sides or bottom when dropped into closed position. This will prevent stress on the bolt handle which could stress the bolt, bolt face, cartridge and action, causing precision to suffer. It takes very little clearance to achieve this with reliability, so leave no obvious and unsightly gaps as you relieve the bolt handle. Finish sand to 400 grit.


Partial Side View of Right Handed Remington 700 - Bolt Handle and Ejection Port


Top View of Ejection Port cut out


Ejection Port
This step can be performed anytime after inletting is complete but does not have to wait until glass or pillar bedding has been performed. The stock should be fully inletted and completely assembled, guard bolts installed but minus the bolt. With a sharp pencil outline the ejection cut out onto the receiver side of the wood. The stock came cut for this but no doubt undersized.

Disassemble rifle. Use small files, round for corners if corners are round and flat for the bottom and sides. Uniformly cut to inside of pencil marks. Reassemble rifle minus the bolt. Mask all metal close to work with tape so as not to scar. Cut sides of port 90 degrees, perpendicular with receiver. Cut the bottom to match the angle of receiver rail. An example is the model 700 slopes slightly downward, as shown above. The slope at bottom should taper through the two corners, not before corners, and become 90 degrees of stock face for the two sides. When not much wood is needed to remove, disassemble rifle and remove masking tape from receiver. Remove only small amounts of wood with sanding block only, periodically reassembling to check. The dimension and angles of port should match that of the receiver. Finish sand to 400 grit.


----->Go to Next Page (Floating the Barrel)
<-----
Go back to Previous Page

Other Topics available:
Wood Stains and Gun Stocks
Floating the Barrel
Glass Bedding
Pillar Bedding
Barrel Bedding Block
Inlays, Tips, and Caps
What is M.O.A.?
Calculating Rifle Precision
Target Crowning a Muzzle
Building a Muzzle Loader from Kit
Eliminate Trigger Over-Travel
Attaching the Recoil Pad


Text and graphics Copyright 2000-2006© Riflestock.Net. Written and compiled by Roger C. Linger.      Email: austin_long@yahoo.com